One Sheet Designing
|
Get paid for commercial fashion, magazine & product advertising design?!? Yes you! Learn the skills of Madison Avenue Advertising Designers here. (opens in new window)
Get paid for commercial fashion, magazine & product advertising design?!? Yes you! Learn the skills of Madison Avenue Advertising Designers here. (opens in new window)
|
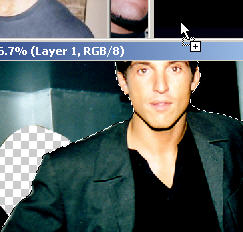
Now you can drag the actor into the design. Make sure to save
the changes in that file if you want to keep the work path (saved
selection). It’s a great idea if you know you might be using it
again in the future so you don’t have to redo complicated or even
simple selections.
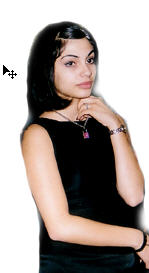
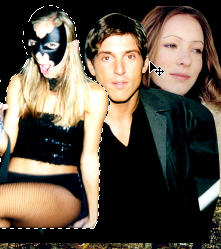
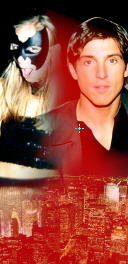
Do the same process again...find some more actors or
characters that you think would fit well into your movie poster
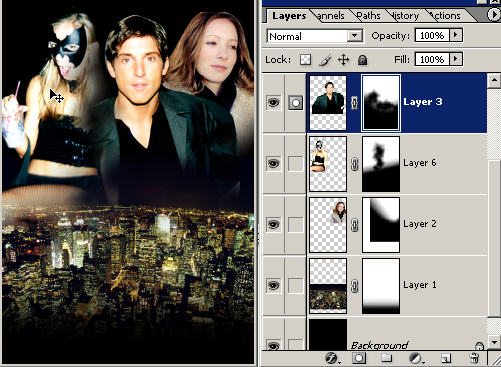
design. This isn’t the perfect mix but it’s intriguing enough. When you have a layer selected in the layers palette with the moVe tool, you can move it around anywhere on the document. To truly be a great designer you must master layers. Fortunately it’s one of the more simple areas to grasp. Take a look at the layer order here. You can obviously tell that the main character is in the center and on top of the other two layers in the layer palette.
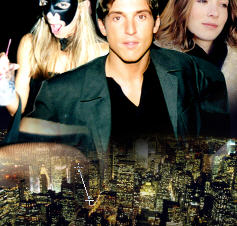
Create a layer mask on each of these layers (one at a time) and go ahead and use the gradient tool to get rid of any harsh edges. I’ll say it again and again...get used to this because it’s about the most powerful feature you’ll ever learn. The layer mask with gradient tool is hands down my favorite Photoshop feature and it’s used religiously in many genres of graphic design. Obi-wan has taught you well my son.
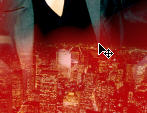
To see your layer masking in action (gradient tool with black foreground) you can toggle the rubylith on and off (located on it’s own channel in the layers palette) by pressing the “|\” key. Red is the default rubylith color (which you can change) and it just shows your masked/hidden pixels on that layer. Here you can see I’m making short swipes with the diamond gradient to create a shadowmasking effect because of the blackground. This is done a lot in plenty of movie posters. It’s a simple and elegant effect that you can easily recreate. Black is a nice color that I think gives you a headstart right away on a design. Combine that with my gradient layer masking and strong source material and you can go places very fast! Even if you’re new in Photoshop.
Here in the layers palette you can see the layer
masks. White stands for the untouched and original pixels and black
and grey represent the areas that have been hidden on that layer.
I’ll use the linear gradient tool to immediately get rid of original photo edge lines and also for example the radial to get in and do spot masking. Even a soft brush doesn’t give you as perfect a result once you master the radial gradient tool (that's what I think).
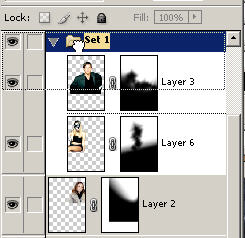
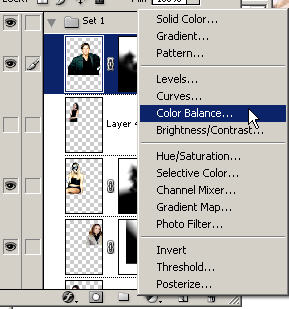
Create a new layer set by clicking on the layer set icon on the bottom of the layers palette. Now drag these layers into the layer set folder for organizational purposes.
Make sure the top layer in this set is selected in the layers palette (the main actor). Now go to the adjustment/fill layer icon on the middle bottom of the layers palette and choose color balance. This will create a color balance layer that applies to all of the visible layers beneath it. You could also create custom adjustment layers for each layer or (follow me if you can) duplicate each of the 3 actor layers, link the new copies together, Layer: Merge Linked or Ctrl E and Ctrl Click on the layer icon and then create a custom adjustment layer. The problem is you can’t move them around then. With the other method you would have to create individual adjustment layers but this is OK because good design should at least take a few minutes! You’ll probably have to balance the color out on each layer separately to get them all similar. In CS you could use Match color to start off.
You could also mask global adjustment layers if you don’t want them to apply to particular areas or other layers of the design. Ok, here is beyond basic Photoshop hehe..
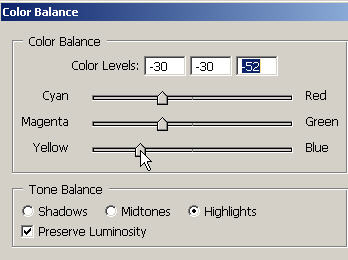
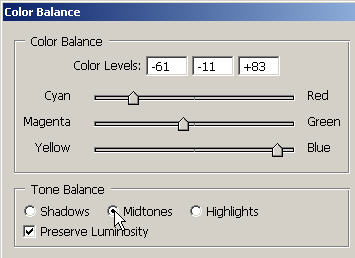
Changing the color balance is a technique that is used all of the time in making one sheets (movie posters). Generally we want all of our actors to be color balanced to one shade. This starts creating a nice poster feel to it. You could also use a Hue adjustment on colorize but this is sometimes too much color. In color balance you can adjustment the shadows, midtones and highlights separately.
|


PHOTOSHOPDESIGN.NET c/o DreamCore Productions, Ltd.
orion@photoshopdesigner.com
Copyright Orion Williams & PhotoshopDesign.net 2004
Adobe, Photoshop, and the Adobe Certified Expert logos are either registered trademarks or trademarks of Adobe Systems, Inc. in the U.S. & other countries. Adobe Product Screen Shots reprinted with permission from Adobe Systems, Incorporated.
BasicPhotoshop.com, AdvancedPhotoshop.com, PhotoshopDownloads.com, PhotoshopDesigner.com, PSDer, iPSD PhotoshopDesign.Net, ClubCast.tv, Discover Photoshop Network, DiscoverPhotoshop.com, PhotoshopRestoration.com, PhotoshopRetouching.com, Digital-Scrapbooking.net, Scrapbook-Templates.com, PhotoshopElements.net & FreePhotoshop.NET are trademarks of DreamCore Productions, Ltd. U.S.A. NAPP is a trademark of PhotoshopUser.com. Use of other trademarks or logos does not imply endorsement from the respective sources.
Contact me for questions, praise or tutorial requests. Join the Free Discover PS Network. Read lots of testimonials.